
Android Data Binding : Tricks and Magic
You can do a lot of awesome things while using the Android Data Binding library. Some will save you a lots of time and some will seem like magic. You can see the full source code for this tutorial here.
The parameter in the @BindingAdapter declares the name of the custom attribute we are creating. The the first parameter to the function marked with @BindingAdapter is always the type of the ui element we are using this custom attribute on. Next parameter is the value the attribute takes in the xml. An now we can use the :typeface attribute in our layouts.
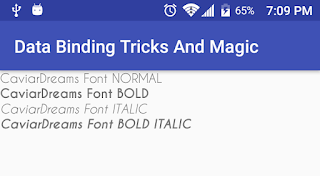
And this is how our custom fonts look:
An that is it! Now we have an attribute we can use to set custom fonts on out sub classes of TextView like EditTexts and Buttons.
Next lets set an image from a url with a custom attribute.
First we need to define our binding adapter:
Next we use the new :srcUrl and :error attributes in our layout:
And this is how our image looks:

Lets begin by defining a model representing the data our adapter will use:
Next we create our adapter:
That's one clean adapter! Notice in the onBindViewHolder() method we dynamically set the variables from our list of AdapterDataItems. Also getItemViewType() returns the layout id in order for us to know which layout to inflate in onCreateViewHolder() method.
Next up lets create some custom attributes for RecyclerView:
Here we define custom attributes to set the :list of models and :layoutManager for our RecyclerView. Now you are all set to use this dynamic adapter with any RecyclerView and any row layouts.
Lets create some layouts for our rows:
This is the layout for a header row.
This is a layout for item row.
We will have a PersonPresenter interface handling all the clicks:
The activity:
In our Activity onCreate() we pass the list of models and the LinearLayoutManager to the binding instance. In getModelList() we created a list of models with header rows and info rows. layout_item_heading.xml binds to a string variable and that variable's id is BR.groupName. BR is a generated class with binding variable ids similar to R class. layout_item_info.xml binds to a Person model and that variable's id is BR.personModel. layout_item_info.xml also takes PersonPresenter for the row's onClick listener. In our case the ListExampleActivity implements PersonPresenter.onPersonClicked() method.
Result:

Custom XML attributes
You can create custom xml attributes and add them to existing UI elements. For example if you ever had to use a custom font files in your application you would always have to set the type face programmatically as the TextView or its sub classes did not have an xml attribute to set the custom type face file from xml. With data binding you can implement your own attributes quick and easy. First lets define our binding adapter.public class AttributeBindings {
@BindingAdapter({"bind:typeface"})
public static void setTypeFace(TextView view, TypeFaceType tft) {
Log.i("AttributeBindings", "setting typeface:"+tft);
Typeface typeface = null;
switch (tft) {
case NORMAL:
typeface = Typeface.createFromAsset(view.getContext().getAssets(), "fonts/CaviarDreams.ttf");
break;
case BOLD:
typeface = Typeface.createFromAsset(view.getContext().getAssets(), "fonts/Caviar_Dreams_Bold.ttf");
break;
case ITALIC:
typeface = Typeface.createFromAsset(view.getContext().getAssets(), "fonts/CaviarDreams_Italic.ttf");
break;
case BOLD_ITALIC:
typeface = Typeface.createFromAsset(view.getContext().getAssets(), "fonts/CaviarDreams_BoldItalic.ttf");
break;
default:
Log.w("AttributeBindings", "unknown typeface passed");
}
if (typeface!=null)
view.setTypeface(typeface);
}
}
The parameter in the @BindingAdapter declares the name of the custom attribute we are creating. The the first parameter to the function marked with @BindingAdapter is always the type of the ui element we are using this custom attribute on. Next parameter is the value the attribute takes in the xml. An now we can use the :typeface attribute in our layouts.
<layout>
    ...
        <TextView
            android:id="@+id/textItalic"
            android:layout_width="wrap_content"
            android:layout_height="wrap_content"
            android:text="CaviarDreams Font ITALIC"
            app:typeface="@{TypeFaceType.ITALIC}"/>
    ...
</layout>
And this is how our custom fonts look:

An that is it! Now we have an attribute we can use to set custom fonts on out sub classes of TextView like EditTexts and Buttons.
Next lets set an image from a url with a custom attribute.
First we need to define our binding adapter:
    @BindingAdapter({"bind:srcUrl", "bind:error"})
    public static void loadImage(ImageView view, String url, Drawable error) {
        Picasso.with(view.getContext()).load(url).error(error).into(view);
    }
Next we use the new :srcUrl and :error attributes in our layout:
<ImageView
            android:layout_width="150dp"
            android:layout_height="wrap_content"
            android:adjustViewBounds="true"
            android:src="@drawable/ic_image"
            app:srcUrl = "@{imgModel}"
            app:error = "@{@drawable/ic_broken_image}"/>
And this is how our image looks:

Dynamic Adapter Magic
As a full time Android developer I had a dream that one day I would no longer have to write repetitive adapters for RecyclerViews. Taking advantage of dynamic variables in Android Data Binding library we can finally write ONE adapter for ALL or our RecyclerViews.Lets begin by defining a model representing the data our adapter will use:
public class AdapterDataItem {
    public int layoutId;
    List<Pair<Integer, Object>> idModelPairs;
    ...
}
The AdapterDataItem model contains layout id field and a list of integer - object pairs. The reason for this is because any layout with data binding can have multiple variables and for dynamic variable bindings we need to know those variable ids for each layout in order to pass the data models from the code.Next we create our adapter:
public class RecyclerViewBindingAdapter extends RecyclerView.Adapter<RecyclerViewBindingAdapter.BindingViewHolder> {
    private List data;

    public RecyclerViewBindingAdapter(List data) {
        this.data = data;
    }

    @Override
    public BindingViewHolder onCreateViewHolder(ViewGroup parent, int viewType) {
        return new BindingViewHolder(DataBindingUtil.inflate(LayoutInflater.from(parent.getContext()),viewType,parent,false));
    }

    @Override
    public void onBindViewHolder(BindingViewHolder holder, int position) {
        AdapterDataItem dataItem = data.get(position);
        for(Pair idObjectPair: dataItem.idModelPairs){
            holder.binding.setVariable(idObjectPair.first, idObjectPair.second);
        }
        holder.binding.executePendingBindings();
    }

    @Override
    public int getItemCount() {
        return data.size();
    }

    @Override
    public int getItemViewType(int position) {
        return data.get(position).layoutId;
    }

    public class BindingViewHolder extends RecyclerView.ViewHolder{
        ViewDataBinding binding;

        public BindingViewHolder(ViewDataBinding binding) {
            super(binding.getRoot());
            this.binding=binding;
        }
    }
}
That's one clean adapter! Notice in the onBindViewHolder() method we dynamically set the variables from our list of AdapterDataItems. Also getItemViewType() returns the layout id in order for us to know which layout to inflate in onCreateViewHolder() method.
Next up lets create some custom attributes for RecyclerView:
@BindingAdapter({"bind:list","bind:layoutManager"})
    public static void setList(RecyclerView rv, List dataItems, RecyclerView.LayoutManager layoutManager){
        rv.setLayoutManager(layoutManager);
        rv.setAdapter(new RecyclerViewBindingAdapter(dataItems));
    }
Here we define custom attributes to set the :list of models and :layoutManager for our RecyclerView. Now you are all set to use this dynamic adapter with any RecyclerView and any row layouts.
Lets create some layouts for our rows:
This is the layout for a header row.
<?xml version="1.0" encoding="utf-8"?>
<layout xmlns:android="http://schemas.android.com/apk/res/android"
    xmlns:tools="http://schemas.android.com/tools">
    <data>
        <variable
            name="groupName"
            type="String"/>
    </data>
    <TextView
        android:orientation="vertical"
        android:layout_width="match_parent"
        android:layout_height="wrap_content"
        android:drawableLeft="@drawable/ic_group"
        android:drawablePadding="5dp"
        android:padding="3dp"
        android:text="@{groupName}"
        android:textSize="18sp"
        android:textStyle="bold"
        tools:text="Group Name"/>
</layout>
This is a layout for item row.
<?xml version="1.0" encoding="utf-8"?>
<layout xmlns:android="http://schemas.android.com/apk/res/android"
    xmlns:tools="http://schemas.android.com/tools">
    <data>
        <variable
            name="personModel"
            type="com.codeprinciples.databindingtricksandmagic.models.Person"/>
        <variable
            name="personPresenter"
            type="com.codeprinciples.databindingtricksandmagic.presenters.PersonPresenter"/>
    </data>
    <LinearLayout
        android:layout_width="match_parent"
        android:layout_height="wrap_content"
        android:orientation="horizontal"
        android:foreground="?selectableItemBackground"
        android:onClick="@{(v) -> personPresenter.onPersonClicked(personModel)}">
        <ImageView
            android:layout_width="40dp"
            android:layout_height="30dp"
            android:src="@drawable/ic_person"
            android:layout_gravity="center_vertical"
            android:padding="5dp"/>
        <TextView
            android:orientation="vertical"
            android:layout_width="0dp"
            android:layout_weight="1"
            android:layout_height="wrap_content"
            android:layout_gravity="center_vertical"
            android:text="First Name:"/>
        <TextView
            android:orientation="vertical"
            android:layout_width="0dp"
            android:layout_weight="1"
            android:layout_height="wrap_content"
            android:layout_gravity="center_vertical"
            android:text="@{personModel.firstName}"
            android:textStyle="bold"
            tools:text="John"/>
        <TextView
            android:orientation="vertical"
            android:layout_width="0dp"
            android:layout_weight="1"
            android:layout_height="wrap_content"
            android:layout_gravity="center_vertical"
            android:text="Last Name:"/>
        <TextView
            android:orientation="vertical"
            android:layout_width="0dp"
            android:layout_weight="1"
            android:layout_height="wrap_content"
            android:layout_gravity="center_vertical"
            android:text="@{personModel.lastName}"
            android:textStyle="bold"
            tools:text="Doe"/>
    </LinearLayout>

</layout>
We will have a PersonPresenter interface handling all the clicks:
public interface PersonPresenter {
    void onPersonClicked(Person person);
}
Finally lets create a new layout and new activity:<?xml version="1.0" encoding="utf-8"?>
<layout xmlns:android="http://schemas.android.com/apk/res/android"
xmlns:app="http://schemas.android.com/apk/res-auto">
<data>
<variable
name="modelList"
type="java.util.List"/>
<variable
name="listLayoutManager"
type="android.support.v7.widget.RecyclerView.LayoutManager"/>
</data>
<android.support.v7.widget.RecyclerView
android:layout_width="match_parent"
android:layout_height="match_parent"
app:list="@{modelList}"
app:layoutManager="@{listLayoutManager}"/>
</layout>
The activity:
public class ListExampleActivity extends AppCompatActivity implements PersonPresenter {
    private ActivityListExampleBinding mBinding;
    @Override
    protected void onCreate(Bundle savedInstanceState) {
        super.onCreate(savedInstanceState);
        setTitle("Dynamic List Bindings Example");
        mBinding = DataBindingUtil.setContentView(this, R.layout.activity_list_example);
        mBinding.setListLayoutManager(new LinearLayoutManager(this,LinearLayoutManager.VERTICAL,false));
        mBinding.setModelList(getModelList());
    }

    private List getModelList() {
        List items = new ArrayList<>();
        //Heading
        items.add(new AdapterDataItem(R.layout.layout_item_heading, BR.groupName,"Employees"));
        //Items
        items.add(new AdapterDataItem(
                R.layout.layout_item_info,
                new Pair(BR.personModel, new Person("Bob","Smith")),
                new Pair(BR.personPresenter, this)));
        ...more items...

        return items;
    }

    @Override
    public void onPersonClicked(Person person) {
        Intent intent = new Intent(this,PersonDetailsActivity.class);
        intent.putExtra(PersonDetailsActivity.TAG_PERSON,person);
        startActivity(intent);
    }
}
In our Activity onCreate() we pass the list of models and the LinearLayoutManager to the binding instance. In getModelList() we created a list of models with header rows and info rows. layout_item_heading.xml binds to a string variable and that variable's id is BR.groupName. BR is a generated class with binding variable ids similar to R class. layout_item_info.xml binds to a Person model and that variable's id is BR.personModel. layout_item_info.xml also takes PersonPresenter for the row's onClick listener. In our case the ListExampleActivity implements PersonPresenter.onPersonClicked() method.
Result:

Conclusion:
As you can see the power of Android' Data Binding library and its potential to simplify and eliminate repetitive tasks in Android developer's everyday life. Hopefully this post was convincing enough for you to start using it in your production applications. What other cool things do you use Data Binding library for? Let me know in the comments bellow!Resources and Further Reading:
- Official Docs
- GitHub project with code for this post
- Getting Started with Android Data Binding in existing project


Such a mind-blowing blog. I am very fascinated with the information.
ReplyDeletearchitecture of selenium
advantages of angular
features of angularjs
validity of aws certification
android 8.0
aws interview questions and answers for freshers pdf
Very nice and good article. Thank you for sharing with us.
ReplyDeleteramanichandran novels
muthulakshmi raghavan novels
sashi murali novels
tamil novels
srikala novels
mallika manivannan novels